Normally, when we think about planting seeds, we think of planting them in the earth, or in soil that's been put into containers. A healthy seed placed into soil and given the proper amounts of water, light, and heat will sprout, or germinate, and grow into a plant.
But did you know that seeds also can be germinated in liquid? It's true. In fact, many plants can be grown into maturity without any soil at all. Growing plants in water instead of soil is called hydroponics, and it's a fascinating type of horticulture. Horticulture, as you might know, is simply the science of cultivating plants. Some people refer to horticulture as an art, particularly when it pertains to decorative plants.
For this science project, however, we're interested in seeing which liquids are best for sprouting seeds. You won't be using hydroponics to grow plants to maturity, but that's something you might want to explore on your own.
Let's get started now and find out which liquids seeds grow best in.
So What Seems to Be the Problem?
The problem, or question that you'll answer in the course of this project, is "In Which Liquid Do Seeds Grow Best?" Following clearly defined steps and procedures, you'll solve the problem during the course of your experiment.
By the time you've finished your experiment, you'll know what type of liquid the seeds you've planted like the best-and the worst. Some seeds may grow quickly, and others may not grow at all. You will have answered whether seeds prefer milk, iced tea, vinegar, orange juice, club soda, or plain old tap water.
Basic Elements
Hydroponics is a fancy-sounding word, but it's nothing more than the practice of growing plants in a water solution to which nutrients have been added. The difference from the regular method of growing plants, of course, is that no soil is used.
The problem you've stated happens to also be the suggested title of your science fair project. While your problem must always be a question that you're attempting to answer, your science fair title does not necessarily have to be in question form. You also could use one of the following names as the title for this project:
- What's the Best Liquid for Germinating Seeds?
- Testing Variables When Sprouting Seeds
Once you've identified and stated your problem, you should take a few minutes to think about the point, or purpose of your project.
What's the Point?
So why should you, or anybody else for that matter, give the slightest thought to sprouting seeds in different liquids? What's the point?
Until now, you've probably assumed that seeds sprout better in water than in any other liquids. Right? Well, maybe they do. In this project, water is the control, or the substance with which we'll be comparing all the other liquids. The other liquids are the variables.
But, unless you've already experimented to find out, you can't be sure that water is the best liquid for sprouting seeds, can you? How do you know that a seed placed in orange juice won't grow into a beanstalk to rival the one Jack climbed in that famous fairy tale?
The point of this project is to use the scientific method to solve the problem stated above and find out in which liquids seeds grow the best.
What Do You Think Will Happen?
Before you state your hypothesis, take a few minutes to think about the liquids in which you'll be trying to sprout bean seeds. We chose bean seeds because they're fairly large and easy to work with, and they sprout quickly, usually in about a week.
Again, the liquids you'll be using are:
- Milk
- Iced tea
- Vinegar
- Orange juice
- Club soda
- Water
You've probably seen, smelled, and tasted nearly all of these substances. If not, you might want to do so before you come up with your hypothesis.
Once you've examined the liquids you'll be using, try to think of some ways in which they might affect the seeds. Are some of the liquids more nourishing than others? Do you think any of them might actually harm the seeds? Once you've given the matter some thought, you can make and record your hypothesis.
Materials You'll Need for This Project
Everything you need for this project should be easy to find. In fact, you probably already have most of the materials in your house. If your science fair is in the middle of winter and you live in a cold climate, you might have a little trouble finding bean seeds in a store near your home. Everything else, however, should be readily available. You need:
- 8 ounces (240 ml) each of tap water, milk, iced tea, vinegar (either white or cider), orange juice, and club soda
- One package of bean seeds
- Six (10- or 12-ounce) (300 to 350 ml) glass or plastic cups, all the same color and size
- Permanent marker
- Tray or shallow pan
- Metric ruler
- Paper towels
Be sure that you've cleared a space and have everything you'll need for your experiment before you get ready to start. And always be sure to check with a parent before you use household items such as glasses or markers.
Conducting Your Experiment
Remember to work carefully and in a logical manner. Try not to knock over any of the glasses, and be sure that you write the correct names of the liquids on the glasses. Water, club soda, and white vinegar all look pretty much the same, but they may have very different effects on bean seeds.

- Using the permanent marker, label each of the six cups with the name of the liquid it will contain.
- Place the cups on the tray or shallow pan.
- Pour 8 fluid ounces (240 ml) of water (your control liquid) into the cup labeled water.
- Pour 8 fluid ounces (240 ml) of each of the other liquids into its proper cup.
- Open the package of seeds and divide them evenly into six piles. You might have a few seeds left over that you won't use.
- Slowly add the seeds from the first pile into the cup labeled water.
- Continue putting the other piles of seeds into each of the five remaining cups.
- Place the tray with the cups where you can easily observe the seeds. You'll want to keep the temperature as constant as possible, so make sure the seeds are in an area where there are no drafts. And, make sure the seeds won't get bumped or knocked over.
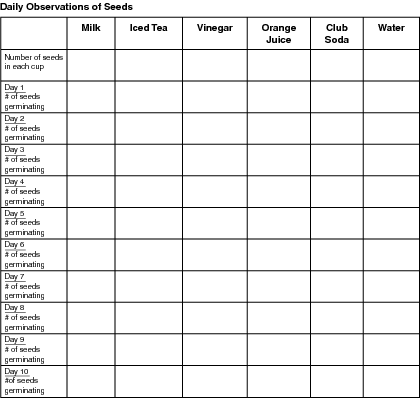
- Keep a daily record of your observations. To do so, write down how many seeds are in each cup, and how many seeds break their shells and begin growing, or germinating, every day. Use the first chart shown in the next section, "Keeping Track of Your Experiment," to help you to record your observations.
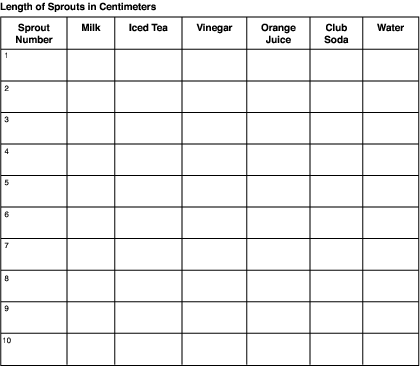
- A week after you placed the seeds in the various liquids, measure each sprout in centimeters. If your seeds haven't sprouted yet, sit tight and begin measuring them at two weeks. You'll need to record the length (in centimeters) of each sprout in every cup. You can make it easier to measure the sprouts by removing each one, placing it on a paper towel, and measuring its length with a metric ruler. Once you've measured every sprout, you'll need to figure out the average length of the sprouts in each liquid.
Use the second chart found in the next section to record the average length of sprouts in each cup after one or two weeks of growth. The average length of the sprouts in each cup is another indicator of which liquid the bean seeds like the most.
Follow these steps to calculate the average length of all the sprouts in each of the liquids:
- Add the lengths of all the sprouts from one cup. If you had four beans in one cup and each of the sprouts was 1/2-inch long, for instance, your total would be 2 inches.
- Divide the total length by the number of sprouts you measured.
- The average length equals the total length divided by the number of sprouts measured.
Keeping Track of Your Experiment
Once you've observed and recorded everything that occurred during the course of your experiment, it's time to present this information clearly.


To do this, you'll need to present all of the measurements you've taken. These measurements should include the following:
- The number of seeds you placed in each liquid
- The number of seeds in each liquid that began germinating on a daily basis
- The average length of seedlings in each liquid after a one- or two-week period
All of these measurements should be neatly presented on the following charts. The number of seeds placed in each liquid and the number of seeds that germinated in each liquid should be recorded on the first chart. The average length of the seedlings should be recorded on the second chart.
Putting It All Together
Once you've analyzed your data, you'll be able to summarize what you've learned, and you'll see whether your hypothesis was correct. You will have reached a conclusion, which is the last step of the scientific method. You will have answered the question posed in your problem, and know if you were right in making your hypothesis.
Remember that if your hypothesis turned out to be incorrect, it doesn't mean that your experiment was a failure. It just means that the results you got were not the ones you thought you would.
The experiment part of your project has ended.
Further Investigation
Standard Procedure
Nearly every scientific experiment can be adapted or modified in order to solve a similar, but not entirely the same, problem. Don't be afraid to use your scientific curiosity and think of other questions for which you want to discover answers.
If you enjoyed doing this project and would like to take it a step or two further, consider what would happen if you grew the seeds in regular potting soil, but watered them with the different liquids you used for this experiment.
Maybe something in the potting soil would react favorably with orange juice, for instance, and cause the beans to shoot up in record time. Perhaps if you watered the seeds with Hawaiian Punch, your bean plants would produce red beans.
If you're interested in investigating this idea, just adapt the steps you used when sprouting beans in the liquids. And have fun!
Green thumbs for everyone!
Teach your pupils about horticulture and hydroponics with this hands-on printable science activity. Pupils will attempt to sprout plants in different liquids and observe which liquids generate growth.


