People love watching weather reports (The Weather Channel, anyone?) and talking about the weather. Storms sometimes are the top headline on the nightly news, with reporters outside covering them. The concept of windchill adds an extra dimension to weather-related conversations, and gives us added reason to complain when it gets very cold and uncomfortable outside.
In this section, you'll learn a little about windchill, and the materials that best guard against it. If you've ever been outside on a very cold, windy day, you know that this is information you'll be able to put to good use.
So What Seems to Be the Problem?
We've probably all experienced windchill firsthand. Windchill is when your thermometer is telling you one thing, but your face and hands are telling you a different story.
Stated a little more scientifically, windchill is a term that meteorologists use to describe how the air temperature feels, due to the effects of the wind. The windchill factor, according to our trusty dictionary, is the temperature of windless air that would have the same effect on exposed human skin as a given combination of wind and air temperature.
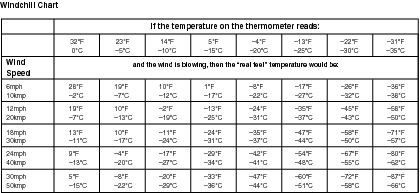
Below is a chart that shows real temperatures and "real feel" temperatures, which are how cold it feels with the windchill factored in.

We hear much more about windchill than we used to, but it's by no means a new concept. The term "windchill" was coined in 1939 in a dissertation called "Adaptation of the Explorer to the Climate of Antarctica."
Written by Paul Siple, an Antarctic explorer, the dissertation explored the relationship between wind and outdoor comfort level, among other things. In the years following the dissertation, Siple and fellow explorer Charles Passel experimented with how long it took to freeze water that was exposed to the elements.
You probably can guess what they discovered-that the time needed to freeze water depended on the temperature of the water to start, the outside temperature, and the wind speed. That work spawned the windchill factor, which is still calculated and used today.
The windchill factor is not an actual temperature, but a measure of how quickly heat is lost from an object. An algebraic formula is used to determine windchill. The windchill formula was revised and implemented by the National Weather Service in 2001. To see the formula and learn more about windchill, check out this website: www.usatoday.com/weather/resources/basics/windchill/wind-chill-formulas.htm.
The problem you'll be attempting to solve by doing the experiment in this section is which materials insulate best against windchill. Using common materials probably already in your house, you'll check out which ones protect water exposed to wind. In this case, the wind will come from a fan. That way, you can do the experiment any time you want, and you don't have to hang around outside on a cold, windy day.
If you want to, you could use the name of the section, "Which Materials Insulate Best Against Windchill?" as the title for your science fair project. Other titles to consider include:
- Protecting Against the Big (Wind) Chill
- Warding Off Windchill
- How Can You Avoid the Effects of Windchill?
In the next section, we'll take a look at why it's important to have an understanding of windchill and which materials can protect against it.
What's the Point?
For instance, how many times have you sat down to eat a bowl of soup, or drink a cup of hot chocolate or hot tea, only to find out that it's too hot to put in your mouth?

When that happens, what do you do? If you're like a lot of folks, you blow on the soup or the beverage to make it cool enough to eat or drink. Let's think about why blowing on your soup makes it cool faster than simply letting it sit on the kitchen table for a few minutes.
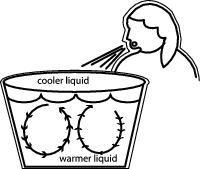
When you blow on your soup (and, please, don't ever blow on anyone else's soup-it's considered rude!), you're simulating the action that the wind performs on your face and hands on a cold, windy day. By blowing on the soup, you increase the movement of the air around it, which lets heat escape from the surface of the soup more quickly.
Not only does this air cause the soup to cool more quickly, it causes an interesting action to occur within the bowl (who would have thought that a bowl of soup could present so many scientific opportunities?). As heat escapes from the top layer of the soup, the slightly cooler, and now slightly denser, liquid sinks to the bottom of the bowl. This causes the hotter, and less dense liquid to rise to the top of the bowl, creating a convection current. This process is called convection.
It's the windchill, caused by you blowing on the soup, that causes the soup to cool-just as it's windchill on your skin that makes it feel colder outside than indicated on the thermometer.
Often, instead of worrying about making soup or coffee or hot chocolate cooler, people worry about keeping it hot. Restaurants that pack food and drinks to go are careful to enclose it in material-usually Styrofoam-that will help to keep the food hot until you eat it. If you ever got a cup of hot chocolate or some soup from a take-out restaurant, chances are it was in a Styrofoam cup or bowl.
In your experiment for this science fair project, you'll test five containers made of different materials to determine which would insulate best against windchill and keep your soup or hot chocolate the hottest. You'll find out whether Styrofoam, as most restaurants seem to think, is the best insulator.
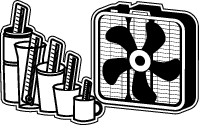
It's important to get a good assortment of cups. Those recommended to use are an insulated coffee mug; a regular, ceramic coffee mug; a glass cup; and a plastic cup. You'll test which container protects best against windchill by pouring boiling water into each cup, inserting a thermometer, and setting all the cups in front of a fan. You'll know which cup insulates best against the windchill caused by the fan because that water will stay the hottest for the longest time.
The Styrofoam cup will be the control, and the other types of cups the variables.
By seeing which type of cup insulates best against windchill, you'll learn whether those restaurant folks really know what they're doing.
What Do You Think Will Happen?
You probably already have a good idea of which types of containers keep liquids hot and which don't. So you should be able to make an educated guess-or hypothesis-about how quickly the water in each cup will reach room temperature.
If you trust that restaurants and packaging companies know what they're doing, you might guess that the Styrofoam cup will protect best against the windchill caused by the blowing fan. Or you might think one of the other cups will do a better job.
You will come up with a quantitative measurement for each cup tested. Quantitative means to describe a property of an object using numeric measurements. Examples would be the amount of water used, the temperature of the water and the time it takes for the water to cool down to room temperature. The words amount, temperature and time all imply a number value with these terms. These properties are all quantitative.
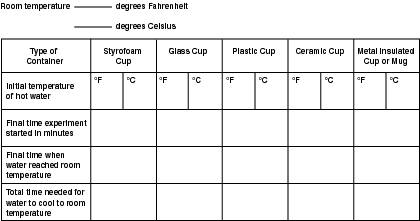
You can record your results on the data chart in the section called "Putting It All Together."
Materials You'll Need for This Project
You can use practically any type of fan for this experiment, and a window-type air conditioner that blows cold air inside would work, as well. You just need to make sure that you can place the cups at a level where they'll receive the full effects of the fan when it is turned on.
You will need five thermometers for this experiment, preferably the same type. You can find these at a hardware or home-improvement type store. Don't use fish aquarium thermometers. They don't measure to 212 degrees Fahrenheit (100 degrees Celsius), which is the temperature at which water boils.
You'll need a tray to hold the five cups; make sure it's large enough and sturdy enough.
You can boil the water you'll use in a pot or teakettle on the stove, or in the microwave. If you use the microwave, make sure you can heat at least 24 fluid ounces (720 ml) all at once. You'll be pouring six ounces (180 ml) of the boiling water into each of the five cups.
The materials you'll need for this experiment are listed below:
- A fan
- Eight-ounce (240 ml) Styrofoam drinking cup
- Eight-ounce (240 ml) glass drinking cup
- Eight-ounce (240 ml) plastic drinking cup
- Eight-ounce (240 ml) ceramic mug
- Eight-ounce (240 ml) metal insulated cup
- A tray large enough to hold the cups
- Five thermometers
- A one-cup glass measuring cup
- Twenty-four fluid ounces (720 ml) of boiling water
- A clock or watch with a second hand
When you've collected all the materials, you'll be ready to begin your experiment.
Conducting Your Experiment
Follow these steps:
- Place the fan on the floor or on a table.
- Check and record the temperature in the room so you'll know when the water in the cups has reached room temperature.
- Place the five cups side-by-side on the tray.
- Place the tray 18 inches (45.7 cm) away from the fan. Note: All of the cups must be on the same level as the fan, so that the wind blows directly on them.
- Pour six fluid ounces (180 ml) of boiling water into each cup.
- Immediately place a thermometer in each cup and record the temperature of the water. Record these temperatures in a data chart similar to the one in the next section, "Keeping Track of Your Experiment."
- Turn the fan on to its highest setting, and write down the time that you turned it on. This is the starting time for your experiment.
- Check the thermometers frequently, watching carefully at what time the water in each cup reaches room temperature. Record that time for each cup.
- Repeat steps 1 through 8 two more times. Doing three trials will give you much more accurate results than just doing the experiment once. You'll have to make two more data charts on which to record the results of the additional trials.

Work carefully and remember to keep checking the temperature of the water in each cup.
Keeping Track of Your Experiment
If you do this experiment three times, you're going to have a lot of numbers to record. Use a chart such as the one below to record the results of each of the three trials.

Putting It All Together
Once you've completed your experiment and recorded your data, it's time to definitely and decisively proclaim the best cup for protecting against windchill. You'll be giving a quantitative analysis, based on the times recorded on your data charts.
If you did three trials, you'll need to average the times you got for each cup. You do this by adding the three times together, and then dividing by three. That number is your average time.
So which of the five cups insulated best against the effects of the windchill produced by the fan? How does your hypothesis measure up? Were you right?
Further Investigation
If you enjoyed this project and want to follow up a little bit, a couple of ways you can extend it or vary it are listed below.
- Compare the effects of windchill on several types of insulated cups of different brands. This would allow you to compare the same kind of cup, but find out which brand works best.
- Use six of the same kind of cup (say, Styrofoam), but wrap five of them in different materials such as felt, silk, aluminum foil, wool, and so forth. Keep one container unwrapped to serve as the control. Follow the same procedures as described in the main experiment, and you'll discover which materials most help to retain the heat of the water.


