It seems at times that we are a society drowning in plastics. We buy a package of cookies that's enclosed in plastic, then put it in a plastic bag to carry home.
People who don't recycle might open the cookies, stuff the plastic wrapping back into the plastic bag, and stuff that plastic bag into a plastic trash bag to be thrown away.
Fortunately, many people do recycle, and more and more are becoming aware of methods for cutting down on the amount of plastic they use. There are movements underway that encourage people to invest in reusable cloth bags for shopping, or to return plastic shopping bags to a recycling center at the grocery store.
Many communities offer recycling pickup, or have drop-off centers where residents can dispose of recyclable materials.
Recycling, however, does not happen all that easily. Getting your recyclables to the curb or to the drop-off center is the easy part.
Plastics are generally sorted by and recycled by type. There are seven types of plastic labeled for recycling purposes. The recycling code is normally on the bottom or side of a container, and is a number within a triangular set of three arrows. Separating and recycling plastics in this way produces a more consistent and higher-quality product.
Once separated, the plastic needs to be cleaned to remove contaminants. This normally is done by cutting the plastic into small pieces, which then undergo a washing and drying process. Those small pieces are then converted into plastic pellets, which can be used to make new plastic products.
Nearly everyone agrees that recycling is not only a good idea, but necessary if we are to continue to inhabit this earth. We can recycle materials other than plastic, of course, but because we use so much plastic, its recycling is of vital importance.
In this section, you'll learn more about how plastic is made, and the properties of different types of plastic. Your task, after working with different types of plastics for a while, is to see if you can identify each type without looking at the recycling symbol it contains.
So What Seems to Be the Problem?
The problem is that recycling is a tedious process. Mostly, that's because the plastic needs to be separated by type. The problem you'll attempt to solve is whether you can differentiate between various types of plastic, based on their physical and chemical properties.
Once you're able to do so, you can appoint yourself as chief recycler in your household, or volunteer at your community's recycling center.
A plastic is a type of polymer. A polymer is a chemical compound that is made up of repeating units of molecules called monomers.
Monomers are made up of two or more carbon atoms, bonded to one another with hydrogen, which is bonded to the carbons. In some plastics, there can be other elements bonded to the carbon as well, such as chlorine or fluorine or nitrogen.
These different elements in the monomers contribute to the different properties of the different types of plastics.
If you want to, you can use the name of the title of this section, "How Can Different Polymers Be Identified?" as the title of your science fair project. Some other titles you might consider are listed here.
- How Do Your Plastics Stack Up?
- Physical and Chemical Properties of Different Types of Plastic
- Recycling Revisited
Or you can think of your own title for your project.
What's the Point?
Knowing more about the plastics you use in your daily life will help you to understand their physical and chemical makeups, and be better able to appreciate the procedure of recycling.
In this experiment, you'll test the properties of six types of plastic. (You won't be working with any from the seventh category, which includes a wide range of substances under the grouping of "other plastics.") Because you'll be comparing all the different kinds, you won't have a control and variable. You won't be using one type of plastic as the control and comparing all the other types to it. You'll examine six types of plastic and make comparisons between all of them when you've finished.
As recycling technology improves and, hopefully, more attention is called to the importance of recycling, we will see additional methods of reusing plastics and other materials.
What Do You Think Will Happen?
Once you have learned more about the properties of plastics, you can make an educated guess about how well you'll be able to identify different types.
You will be performing specific tests on six types of plastic, and taking notes about what you observe. The six types of plastic you'll need to work with are listed here.
- Polyethylene terephthalate (PET). Nearly a quarter of all plastic bottles-including carbonate beverage bottles-are made from this type of plastic. So are meat wrappers, filling for pillows, and cosmetic wrappings.
- High-density polyethylene (HDPE). This type of plastic is used to make about 60 percent of all plastic bottles, such as those containing milk, detergents, shampoo, bottled water, juices, and antifreeze. It's also used for plastic grocery bags and freezer bags.
- Polyvinyl chloride (PVC). Some bottles-primarily those used to hold cleaning agents-are made from this type of plastic. So are electrical conduit, plumbing pipes, blister packs, and roof sheeting. A variation of this type of plastic is used to make garden hose, shoe soles, blood bags, and cable sheathing.
- Low-density polyethylene (LDPE). This type of plastic is used in filmy-type bags such as garbage and bread bags, squeeze bottles, garbage cans, and irrigation tubing.
- Polypropylene (PP). Microwave containers, drinking straws, potato chip bags, yogurt containers, plastic buckets, and plastic patio furniture all originate from this kind of plastic.
- Polystyrene (PS). This kind of plastic is used to make deli and salad bar take-out containers, plastic cutlery, clear plastic cups, and plastic sleeves for cookies or crackers. A variation of this type of plastic is Styrofoam, used for beverage cups, meat-packaging trays, and protective packaging.
If you take a look around your house, you can probably come up with a sample of each of the six types of plastic. Once you've rounded up a sample of each plastic 1 through 6 (raid your neighbor's recycling can if you need to), take a few minutes to look at what you've got. Notice the differences in the plastics. Some are smooth and pliable, while others are brittle and rigid. Some are clear, while others are opaque.
Do you think, after you've tested the properties of each type of plastic, that you'll be able to figure out which is which without the benefit of the recycling code?
Materials You'll Need for This Project
There are some materials you'll need for this project in addition to the six types of plastic you'll be testing. First, however, be sure that you do have samples of plastics coded with identifying numbers 1 through 6.
The rest of the necessary materials, listed below, can be found in a grocery store if they're not already in your home.
- Isopropyl rubbing alcohol
- Light corn syrup
- Water
- Metric or standard measuring spoon
- Four small, plastic cups or bowls
- Candle and matches for flame test
- Kitchen tongs
- Pail of water
- Fine-tipped permanent marker
To prepare for your experiment, you'll need to cut five samples from each of the plastic containers you've gathered. You need to have five small pieces of type 1 plastic, five of type 2, and so on, through type 6. All together, you'll have 30 little pieces of plastic, divided in six groups of all-same pieces, each one between a one- and two-inch square.
Conducting Your Experiment
The rubbing alcohol, corn syrup, and water are necessary to create a substance of known density. You will mix them together in different combinations of ingredients, and this will allow you to test the density of each type of plastic. Be sure to use care when performing this part of the experiment. Work in a well ventilated area of your home, or, better yet, outside. Take care not to breathe in the smoke produced by the burning plastic.
Follow these steps:
- Using a fine-tipped permanent marker, write a "1" on each of the five sample pieces taken from the item you collected that was identified as plastic number 1.
- Write a "2" on the pieces from plastic-type 2, a "3" on those from type 3, and so on, until all the small pieces are marked with the number that corresponds with the type of plastic from which they were cut.
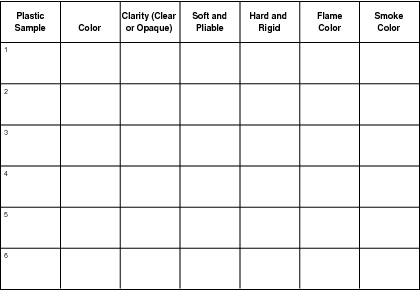
- Observe the color and clarity of each piece of plastic. Write these observations on the first chart found in the next section, "Keeping Track of Your Experiment."
- Determine if your sample is soft and pliable, or rigid and hard. Put a check mark in the appropriate column of the same chart.
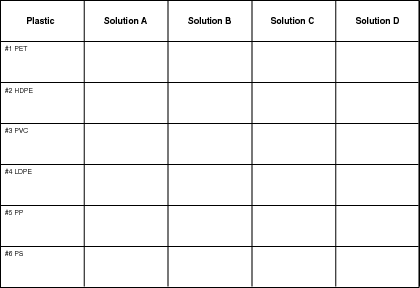
- Prepare the solutions listed in the box below, each in its own bowl. These solutions will be used to test the relative density of each of the six different plastics. If the type-1 plastic sinks in all four liquids, for instance, it means that its density is greater than the density of each of the liquids. If it sinks in two of the liquids but floats in the other two, then its density is somewhere between the density of the heavier liquids and the lighter ones. Label each bowl as A, B, C, or D.
Solutions for Testing Density of Plastics
Solution Mixture of Isopropyl Rubbing Alcohol, Light Corn Syrup, and Water Density in g/ml A 5 ml 70% isopropyl alcohol + 2 ml water 0.91 B 4 ml 70% isopropyl alcohol + 2 ml water 0.93 C water 1.00 D 1 ml light corn syrup + 1 ml water 1.16 - Place one of the five sample pieces of type 1 plastic in the first solution. Record in the second chart found in the next section if the sample sinks or floats.
- Continue testing the density of the same type of plastic in the other three solutions. When finished, you should have one plastic sample from each group left over.
- Repeat step 7 for the other samples. You will be using four sample pieces of each different plastic for this density test.
- Using tongs, hold the last sample from each group over a lighted candle, and observe and record the color of the flame and the color of the smoke in the first chart in the next section. Discard the plastic in a pail of water to ensure that all flames will be extinguished.
- Repeat step 9 with the remaining plastic sample from each group.
Keeping Track of Your Experiment
You can use the charts shown below to record your observations from the experiment. Or you can make your own charts, if you prefer.


Once you've recorded all your information and observations, you'll be ready to determine if you're now able to identify different plastics by considering their characteristics and properties.
Putting It All Together
Think about doing the experiment again, but this time having samples from each group of plastics and not knowing which is which.
Do you think that, knowing what you know from the experiment just completed, you'd be able to identify each sample properly if you again tested the physical and chemical properties of each?
If you're not sure, give it a try!
Further Investigation
Do a little research and learn how polymers are manufactured. Find out what type of process or chemical reaction is used to build these polymers.
If you're interested in the impact that plastic has on the environment, you could learn more about how each type of plastic, including Styrofoam, is recycled.
One word: Plastics
Students study six types of plastic and make comparisons between them based on their physical and chemical properties in this hands-on science activity.


